
The Kopper Kart clone
Vic Collins used to visit John Pazsik's shop when he was just a boy, and developed a love of custom cars from his dad, building 1/24 scale models, and going to car shows. When he got his drivers license, he went through a series of old cars and trucks. He eventually settled into a shoebox Ford, that he had another Jersey customizer, Bob Nitti (co-owner of the Barris Aztec) do some body modifications on. When BOb retired, he came to my shop for more custom work. I installed Studebacker fins on the Ford, and later shopped the top. VIc also found the George Wallace 61 Dodge I now own, another Pazsik built custom.
Vic got the bug to build a replica of his favorite custom truck, the Kopper Kart, and eventually bought a 55 GMC to do so. He and his brother did some work on it, but eventually came to me, as they did not have the equipment, time or place to do the job right. The project struggled along for a couple years, stalling quite a bit, until I saw on the HAMB ( an internet traditional rod and custom forum) that someone else was building a clone of the Kart as well.
This other builder, John Maurice, had been collecting parts, and chopping and sectioning the truck, until he had to move to New York CIty, where building cars isn't very easy. Vic bought out his project, and together with ours, was the impetus to "git'er done!" We made a pact to complete the truck in 16 months and debut it at the Detroit Autorama, exactly 50 years from then the real truck made it's debut in California.
 The Kopper Kart cloneHere it is at the photo shoot for Kustoms Illustrated magazine. I will add more photos and stories as time allows. |  original 55 truck.jpgThis is what an original 55 Chevy pick up truck looks like. |  original kart.jpgThis is the George Barris built Kopper Kart. It was built as a shop truck and for promotion, in car shows. It debuted in 1958, appeared in all the custom car magazines, was sold in 1961. It went to Ohio, where it was shown, then later taken apart, then abandoned and scrapped. |
|---|---|---|
 kart_build 002.jpgVic and his brother Ed, had picked up a 55 GMC truck to use as the basis of the Kopper Kart. They did a bit of work on it at home, but it really got serious when he asked me to help him to do it. |  Kart_build 001.jpgWe started on building the very distinctive nose of the truck. We used replacement headlight repair panels, and widened them for quad headlights. two Studebaker grill pans were given to the project by Barry Mazza, who bought them to build a clone of the Aztec Chevy. He later bought the REAL one and did not need these. |  kart_build 003.jpgTubing used to frame out the quad headlights. |
 kart_build 004.jpgFitting up the Stude pans. |  kart_build 005.jpgMaking small filler pieces to transition the Stude sheet metal into the truck's. |  kart_build 007.jpgFirst attempt to build the nose. First we tried using pieces from an extra hood. |
 kart_build 006.jpgThe shapes were not quite right, and we couldn't figure out what Barris used to make this part, probably something discarded from another build. We had to begin fabricating new ones on my English wheel. |  kart_build 010.jpgThe fenders on the Kart extended all the way up to the cab. We used an extra set to begin making them this way. Extra metal was then added to fill in the difference between the two. |  kart_build 009.jpgThe section job (removing a metal section horizontally through the body) necessitated reshaping and rebuilding the cowl area. |
 kart_build 008.jpgThe nose roughed out and looking pretty close. |  kart_build 011.jpgNext, came chopping the top. Here is our first obstacle. The body had taken a twist, as it was unsupported during sectioning, and very weak in the floor, and body mounts, due to rust. After struggling with it for a while, we took a break. |  kart_build 012.jpgWell. after careful considering, we abandoned our first attempt (K-1) and Vic later picked up a new cab (K-2) |
 kart 001.jpgThe bottoms of the rear fenders had to angle cut to lead to the new pans |  kart 002.jpgThe fenders also had to have new flanges welded to them, to match the new shapes. |  kart 003.jpgLots of pieces of sheet metal cut and welded to mate the fenders to the cowl, and radius the hood corners! |
 kart 004.jpgThe rear fenders were bolted to the bedsides, but welded to the rear pans, and tailgate panels. So once attached, we had limited access to them. So we sandblasted the rust off, and preserved the bedsides before putting the fenders on. |  kart 005.jpgThe parking lights matched the shapes of the headlights, but smaller, and mounted outside of a rolled pan. |  kart 006.jpgAt one point, we welded a square tube bar across the nose to align all the pieces we added to it. like headlight buckets, parking lights, etc. |
 kart 007.jpgThe firewall had to be sectioned, as well as the rest of the body. Most body lines lined up, but the doghouse had to be raised for the engine to fit. | 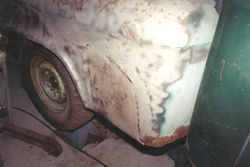 kart 008.jpgFiller panel between the 2 sections of rear fenders. |  kart 009.jpgAdding the hood scoops: measured, and marked. |
 kart 010.jpgOak hammerforms were used to make the scoops. The holes will be transferred to hood and sandwiched together between 2 oak forms. |  kart 011.jpgVic cutting a slit where the front part goes down, and the rear part gets raised up. |  kart 012.jpgRon watches while I start the hammering. The wood sandwich prevents the hood from getting distorted while we stretch the metal into a raised scoop. |
 kart 013.jpgRon's turn, this time using a "caulking" tool to sharply define the edges. Vic watches and coaches. |  kart 014.jpgOne side done! |  kart 015.jpgBoth sides! and the front peak added. More welding on that to come. |
 kart 016.jpgSince the wood forms were relatively flat, and the hood had a slight curve, we had to go back and adjust the sheet metal a bit! Bill Sincox and Stan Orear help out. |  100_0100.jpgWhat the finished scoops look like. Pieces of small tubing were welded to the open edges of the scoops, for a more finished appearance. |  HPIM0078.jpgThe tops of the bedrails were bound to get some abuse, since the truck had a "hard" tonneau cover on it. So I decided to do the bodywork in lead, so it would hold up better. First step it to meticulously clean the area to be leaded, or soldered. |
 HPIM0079.jpgNow, you can either "tin" the clean steel with tinning liquid and rubbing lead on it, or use this easier method. Tinning butter, tinning paste, plus powdered lead. Brush it on generously. |  HPIM0082.jpgYou only use acetylene , as oxy-ac is too hot. You must use a special tip, so it mixes with air to produce a flame. You can also use a propane tank, but it is a bit slower, as it doesn't put out as much heat. |  HPIM0084.jpgHeat the tinning butter until it bubbles, and turns brown, or burnt. |
 HPIM0085.jpgThen wipe it with a clean cotton rag. Don't use anything synthetic, or it will melt onto the panel. The panel should be clean and shiny if done correctly. |  HPIM0091.jpgHeat the panel gently, and just push the lead stick onto it, until you form a mound of it. |  HPIM0087.jpgMove around depositing lead where you need it. It definitely takes practice and careful watching. The lead should be the consistency of peanut butter for this step, and paddling it around. |
 HPIM0099.jpgBunch of mushy lead, isn't very pretty! |  HPIM0092.jpgLead paddles are made of oak or other sturdy wood. First, you treat them so the lead will not stick to them. Heat up some beeswax, and dip the paddle into it, forming a thin coat. Old timers have also used trans fluid or used oil, but I'd prefer not to add any type of contamination, if possible. |  HPIM0094.jpgReheat the lead to working consistency, and spread it around, smoothing it to the contours you want. Leave it slightly thicker than it needs to be. |
 HPIM0102.jpgNow, let cool and use a vixen file to "sand" it down to perfection. IT takes some practice to get this right, but use long, slow even pressured strokes, or the blade will chatter, and skip. you should be able to get the metal perfect with this technique, if you do it right. |  HPIM0105.jpgAlmost there, another pass and it will be good to go! |  kart 001.jpgNow we get to some fun stuff, chopping the top! First, brace up all the openings on the body, and below where you will be cutting the A pillars. |
 kart 002.jpgPrecisely mark off where to make the cuts. |  006.jpgI like to do the cuts with a hacksaw. Much more control over the cut, and precise cuts make for better welds. |  kart 004.jpgFront down, see the difference in the height of the rear? |
 kart 005.jpgThe cab we had, was a small wondow version. The Kart had the large window, so we used an extra roof we had, cleaned off the rust. |  kart 007.jpgVic cleaning up the cut lines on the back of the cab to prepare to install the new sheet metal. |  kart 006.jpgTacked it in place, and Vic made the cuts to match the front. |
 kart 008.jpgIn place! |  kart 009.jpgPushed the truck outside to see how it looked from a distance, and from all angles. I can't stress how important this is when doing custom work! |  kart 010.jpgThe roof had to be widened for the right look, you can't easily angle the front windshield opening, like on a flat glass car. The easier way, if you have a spare roof, is to just widen the roof at the edges, and replace the center with an over-sized cut out center of another roof. |
 kart 011.jpg |  kart 012.jpg |  kart 013.jpgCutting ahead time-wise, but here you can see how the chop came out. |
 100_0002.jpgWe started out with a n early Chevy straight six, which we had to transform into a copy of the modified Corvette engine that the Kart had. John Maurice had it rebuilt and had located the rare 3 x 1 side draft intake and Carter YH carbs. |  100_0008.jpgI wanted the engine to be as show worthy and detailed as the rest of the truck was, so I started grinding off any casting marks, mold lines, and casting roughness. |  100_0009.jpgA carbide burr was used in the concave areas, and there were many! |
 100_0010.jpg |  100_0013.jpgA cartridge roll further smoothed out the concave spots, while finer grit discs were used on the flats. |  100_0014.jpgNice and smooth and ready for primer. |
 100_0016.jpgUsing House of Kolor Epoxy primer, for great durability, adhesion, and toughness. |  100_0020.jpgI actually went through the trouble of guide coating, and blocking the surfaces to find any minor imperfections, and fix them. |  100_0031.jpgSpraying the block in 3 stage HOK Pearl White. 2 coats white base, 2 of intercoat white pearl, and a coat of clear. Keeping the paint thickness to a minimum is important on an engine. |
 100_0047.jpgFinished with paint! |  100_0048.jpgAlso smoothed and painted the bellhousing. |  100_0050.jpgOil pan, too, paintedall separately, and then used stainless bolts to attach the parts. |
 100_0054.jpgLooking good with the accessories! |  100_0055.jpgAs Barris dressed up his, so did we, with finned valve covers, and lifter valley cover. |  2007_1110Image0001.JPGThe frame was sandblasted before we did any work on it. Putting it on the rotisserie made it easy to weld on, and paint. |
 2007_1110Image0004.JPGThe major modification we did to the frame was to "C" it, This allows the axles to sit higher up in the chassis, lowering the vehicle. We made cardboard templates first, cut out the pieces in 1/8" plate, and welded them onto the frame. |  2007_1110Image0013.JPGWelded and ground, we did both front and rear. Then, the mounting pads were cut off both axles, and re-welded on on the bottom, considerably lowering the truck. |  2007_1110Image0014.JPGRon putting the epoxy primer on the frame. |
 2007_1110Image0017.JPGVic following up with black paint. We could have made the chassis "showier" by doing it white or copper, but to be authentic, we left it black, as it would have been as an almost new truck being customized. |  2007_1208KopperKart0004.JPGAll other components were suitably painted, re-bushed, rebuilt, and restored. |  2007_1208KopperKart0024.JPGExcept for the flipped axles, and "Ced" frame, it went along like a stock restoration. |